All documents uploaded to the website must pass a basic accessibility check before they can be published. The standard for our website is based on the ADA mandate to meet the Web Content Accessibility Guidelines (WCAG), specifically Level A and AA. These standards are in place to help ensure that all users on our website can access necessary information in a manner that works for them.
- Creating Accessible Documents in Word
- Fillable Form Fields in Acrobat
- Checking Document Accessibility
- Uploading an Accessible PDF
Document vs Webpage
Before creating a document on the website, you need to consider if the information is best presented as a downloadable document or if it would be better for users to access it as a webpage. Ask yourself how you imagine users will be interacting with your content. If they will be viewing it on the web with no real need to print it out, then it should be a webpage instead of a document.
Some examples:
- An instruction guide, FAQ, or informational document that does not need to be printed out: Webpage
- A form that needs to be filled out and returned: PDF Document
- A calendar or schedule of events: Possibly both. This is one of those use cases where it might be beneficial to have a webpage with a list view of events that people can reference easily from anywhere but also a PDF calendar view that they can download and print out.
Creating Accessible Documents in Word
Accessible documents begin in Word, before they become PDFs. It is important to set up the initial document correctly the first time so that any updated PDFs made from the same Word file will carry over the correct accessibility.
Word has a great accessibility checks built in that can be utilized to make sure files are being created in an accessible manner but it doesn't catch everything. It is important to understand basic document accessibility and to keep these rules in mind when creating your documents.
Document Properties
One of the most common issues we see in uploaded documents is a missing document title. You can fix this easily in Word before it's a problem by going to File > Info and giving your document a title under the "Properties" section.
Heading Structures
Headings are used to visually and structurally break up long content in the document. You can think of them like chapters, sections and subsections in a text book. If you were to pull just the headings from a document, you should end up with an outline of the document's content. In fact, in Word you can see what your document structure looks like by using the Navigation Pane under the "View" tab.

The Navigation Pane will pop up on the left to show you all of the headings present in your document. It will also display the nesting structure of those headings. Use this pane to make sure you are using the headings in the correct order and nesting them appropriately.
Screen readers use heading structures to help users navigate the page. Just like sighted users scan bold titles, screen reader users can jump from heading to heading to find what they need quickly.
Back to our text book analogy, the document title is the chapter title so it is always a Heading 1. Any Heading 2s would be the sections in that chapter and Headings 3-6 are all subsequent subsections beneath those Heading 2s.
This training page is a good example of how heading structures can be used.
Heading Structure Tips
- Your document title is the Heading 1
- After the title, start with Heading 2s: These are your big main sections of content.
- Use headings in order: Heading 3s belong under a Heading 2, Heading 4s belong under a Heading 3, etc.
- Don't skip levels: Don't jump from a Heading 2 to a Heading 4 for example. It may confuse screen readers and those that rely on them to navigate.
- Headings are for structure, not style: Don't use headings just to make text look big, bold or change the color. If you don't like the default heading styles in Word, you can always change the look of them without changing the type of heading.
Alternate Text and Captions
If your document requires images, figures, or diagrams you will need to ensure that they are readable through the use of alternate text and captions. Even images used as background decoration need to be marked as such to let screen readers know the context of the images.
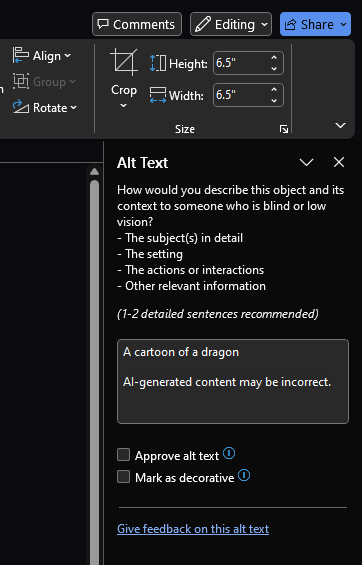
To add alternate text to images in Word, right-click on the image in the document and select "View Alt Text" from the submenu that pops up. This will open a new pane on the right. In the newer versions of Word, this pane may appear with some AI-generated alt text already filled in. You need to write your own alt text or approve the text that is currently there.
Alternate Text for an image should convey what the image is depicting in a manner that is both short and descriptive. Remember, this text will be read out loud to screen reader users who cannot visually see the image themselves. It needs to give them a clear idea of what the image is showing. Many times, the AI generated alt text is not descriptive enough and needs to be edited to add more detail.
If an image is there solely for decoration, you can use the "Mark as decorative" checkbox in the Alt Text pane to denote this. In that case you do not need to write any Alt Text for the image as it should be skipped by screen reader software.
Captions can be used in a similar manner to Alt text to convey relevant information and context about an image. You can use the same text in both places, or you can use the Alt Text to describe the image and the caption to give context. A good example of using both is in this article. Hover over the images to see the chosen Alt Text and how it differs from the Captions provided on the images.
Alt Text and Captions Tips
- Alternate Text is required on all images in a document with the exception of decorative images which need to be marked as such.
- If your image has words on it (such as a poster, logo, or promotional image), the Alt Text must have all of the same information. Don't summarize. Copy word for word what is on the image into the Alt Text to ensure that your screen reader users have the same information available to them as any visual user.
- The exception to this rule are images like the ones in this article where the words themselves are not relevant to the context of the images.
- Alt Text needs to convey all relevant information to the user: This includes the subject(s), setting and interaction happening in the image.
- Word's AI generated alt text is almost never sufficient. Make sure you check the text on all images and add detail as needed even when Word has generated text for you.
Form Fields
To create a form fillable PDF, you should denote the form fields in Word before you export the document to PDF. You could export the document to PDF without adding any visual indication of fields but then you'll be stuck manually adding each field you need rather than utilizing Acrobat's built in Form tool.
To mark the form fields in Word, use underscores and shapes to visually imply where form fields should be. In Acrobat, underscores will be read as text fields, boxes will be read as checkboxes, and circles will be read as radio buttons. The visual mark for the fields should be to the left (checkboxes and radio buttons) or right (text fields) of the text that labels the field in order to be properly marked in Acrobat.

Once all your fields are visually indicated, you can export your document to PDF using the steps below then move on to the "Creating a Fillable Form in Adobe Acrobat" section to finish the form.
Form Fields Tips
- Underscores = Text Field
- Square = Checkbox
- Circle = Radio Button
- Make sure fields are indicated next to their respective labels. Placing field indicators in between text or below text can sometimes confuse the Acrobat tool. Confusion like that can be fixed manually but for the easiest time, it's best to indicate a field next to the field label and only have one field per line if possible.
Exporting to an Accessible PDF
Once your document is all set in Word, it is time to export it to PDF. To ensure that all the accessibility stuff comes through you want to export using the "Acrobat" tab rather than using File > Save As > PDF. Navigate to the Acrobat tab and select the "Create PDF" button. Follow the instructions to save the new file and wait for the export to finish. The new PDF may open in Acrobat automatically which makes it easy to do your final check below. If it doesn't, just navigate to where the file was saved and open it in Acrobat from there then move on to the next section.

Creating a Fillable Form in Adobe Acrobat
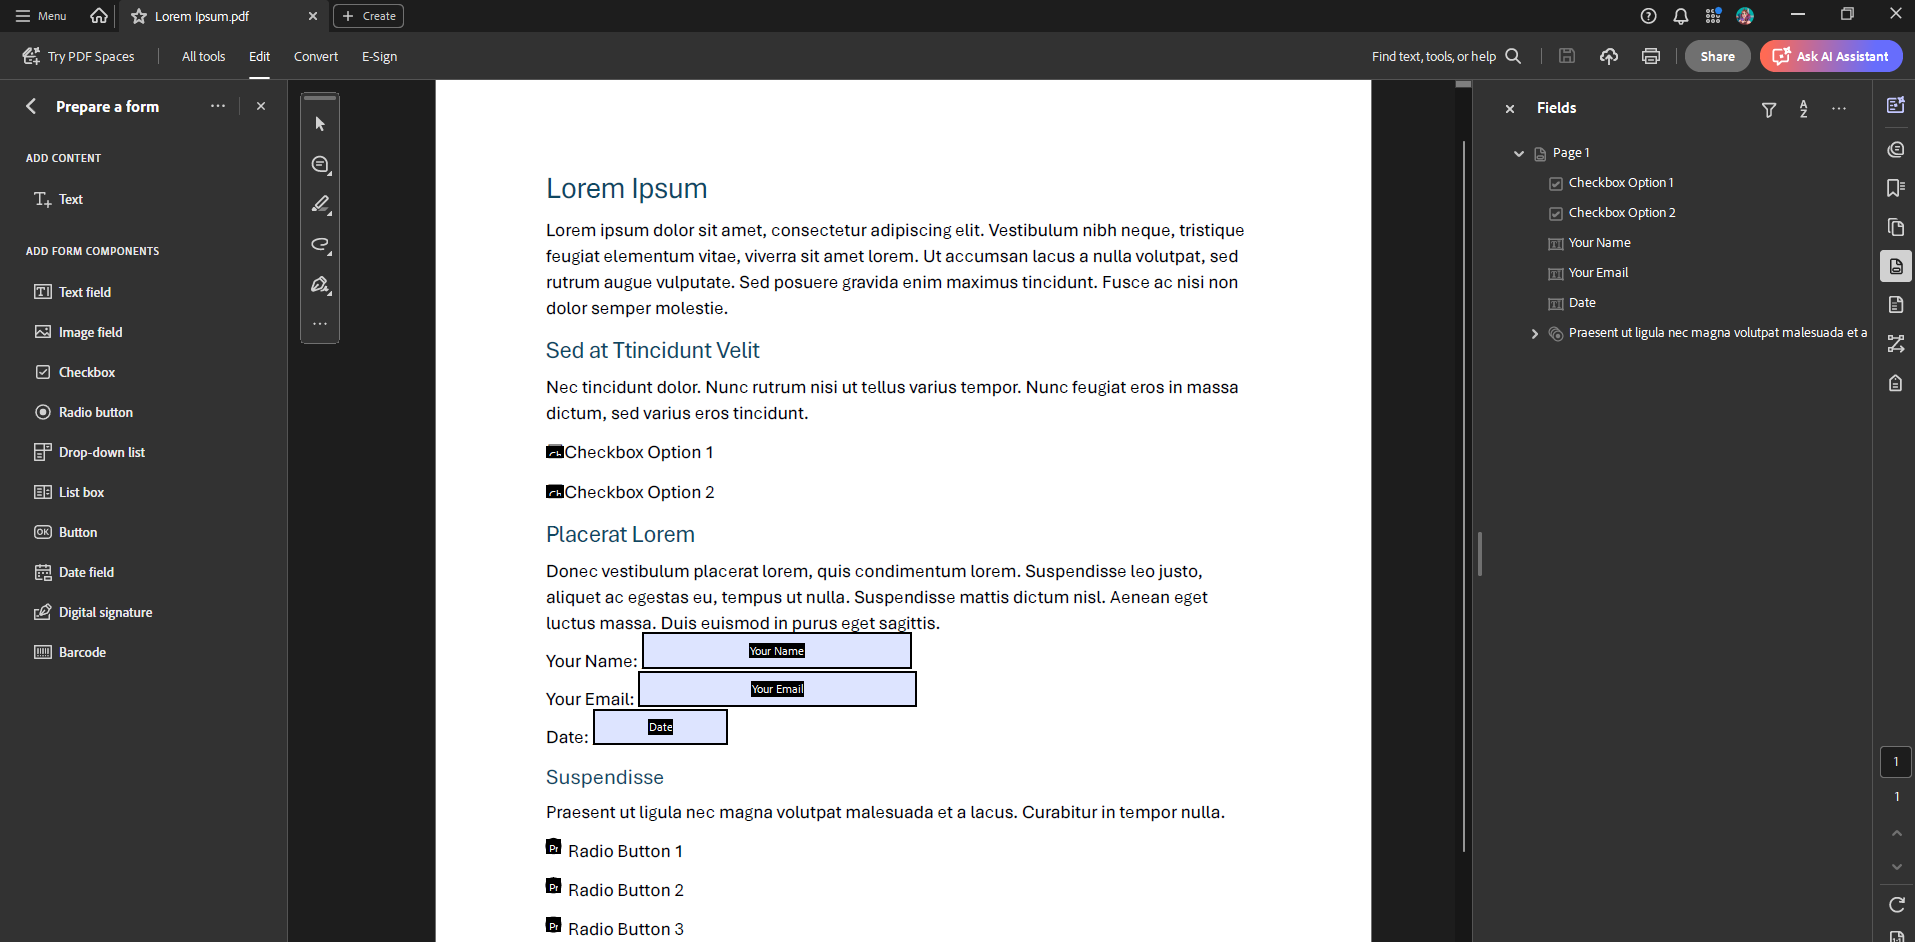
To create fillable form fields, you need to use the "Prepare a Form" tool in Acrobat. Selecting the tool will bring up a screen asking you to select files from which to create the form. Since your form document is already open, it should be automatically selected. If it's not, you can use the "Change File" link to select the correct document. Make sure "Auto-detect form field" is ON then just hit the "Create Form" button at the bottom.
Acrobat will do it's best to auto-detect your form fields. When the auto-detect is done, you should see your new fields on the document and a full list of them in a sidebar on the right. The auto-detect is pretty good but it can make mistakes so make sure to go through the checklist below before moving on to the next section.
Double check that the auto-detect tool:
- Didn't miss any fields
- Assigned the correct type of field to each one
- Correctly assigned the field name
- Has the fields in the correct order to be filled out
If any of these have issues, you'll need to manually correct them.
Add Missed Fields
To add a missed form field, select the type of field you want to add from the left sidebar then click in the document where the field should go. You'll get a new box on your form with a generic name (ie "Text1" or "Checkbox1" etc) and should see a new field pop up in the list on the right. Do this for any missed fields. When you're done you can click on the pointer icon in the upper left of the document section to get out of the field creation tool.
Once you have your fields added, you can move them around by clicking and dragging them into position. Use the circles along the outside to resize the fields. To update the name of the field, right click on it and select "Properties" from the menu. Input the field name in both the Name and Tooltip boxes then you can close the popup.
You should see the field name change in both the field box in the document and in the right sidebar. To reorder the field, select it in the right sidebar list and drag it to it's proper place in the order.
Change an Incorrectly Assigned Field Type
Unfortunately, there is no way to swap a field to a new type. If Acrobat incorrectly assigned a field type, you'll have to delete that field and readd it as the correct type using the steps above.
Change Incorrect Field Name
Acrobat uses the text around a field to try to guess what the field name should be. Depending on how your document is set up it may not grab the correct text. To change the field name, right click on it in the document or in the list on the right and select "Properties" from the menu. Input the correct field name in both the Name and Tooltip boxes then you can close the popup.
Change Field Tab Order
If you have a document with multiple fields on the same line and multiple lines of fields, Acrobat may not order them correctly. To reorder the fields, select them in the right sidebar list and drag them into the proper order. The order should be determined by how a user would logically fill out the form if doing it by hand. Typically, left to right, top to bottom.
Checking Document Accessibility
To check that your PDF exported with the correct accessibility features, you need to look at it in Adobe Acrobat. Acrobat comes with great built in tools to help manage document accessibility and to make forms fillable should that be needed. If you don't have Acrobat on your computer, you can install it through the Adobe Creative Cloud using your SLU credentials. Follow the instructions in this IT article to install Acrobat.
Acrobat Accessibility Checker
To check your document in Acrobat, open the document and click on the "Prepare for accessibility" tool. This gives you a couple of options but for this initial check, we just need to use the "Check for Accessibility" option. This will bring up a popup with a bunch of options. Leave them set to default and just click on the "Start Checking" button at the bottom.
A new sidebar will appear on the right. This section will list any accessibility issues it found in the document under seven different categories (Document, Page Content, Forms, Alternate Text, Tables, Lists, and Headings). If a category lists a number of issues next to it then you'll need to open the category to manually fix the issue.
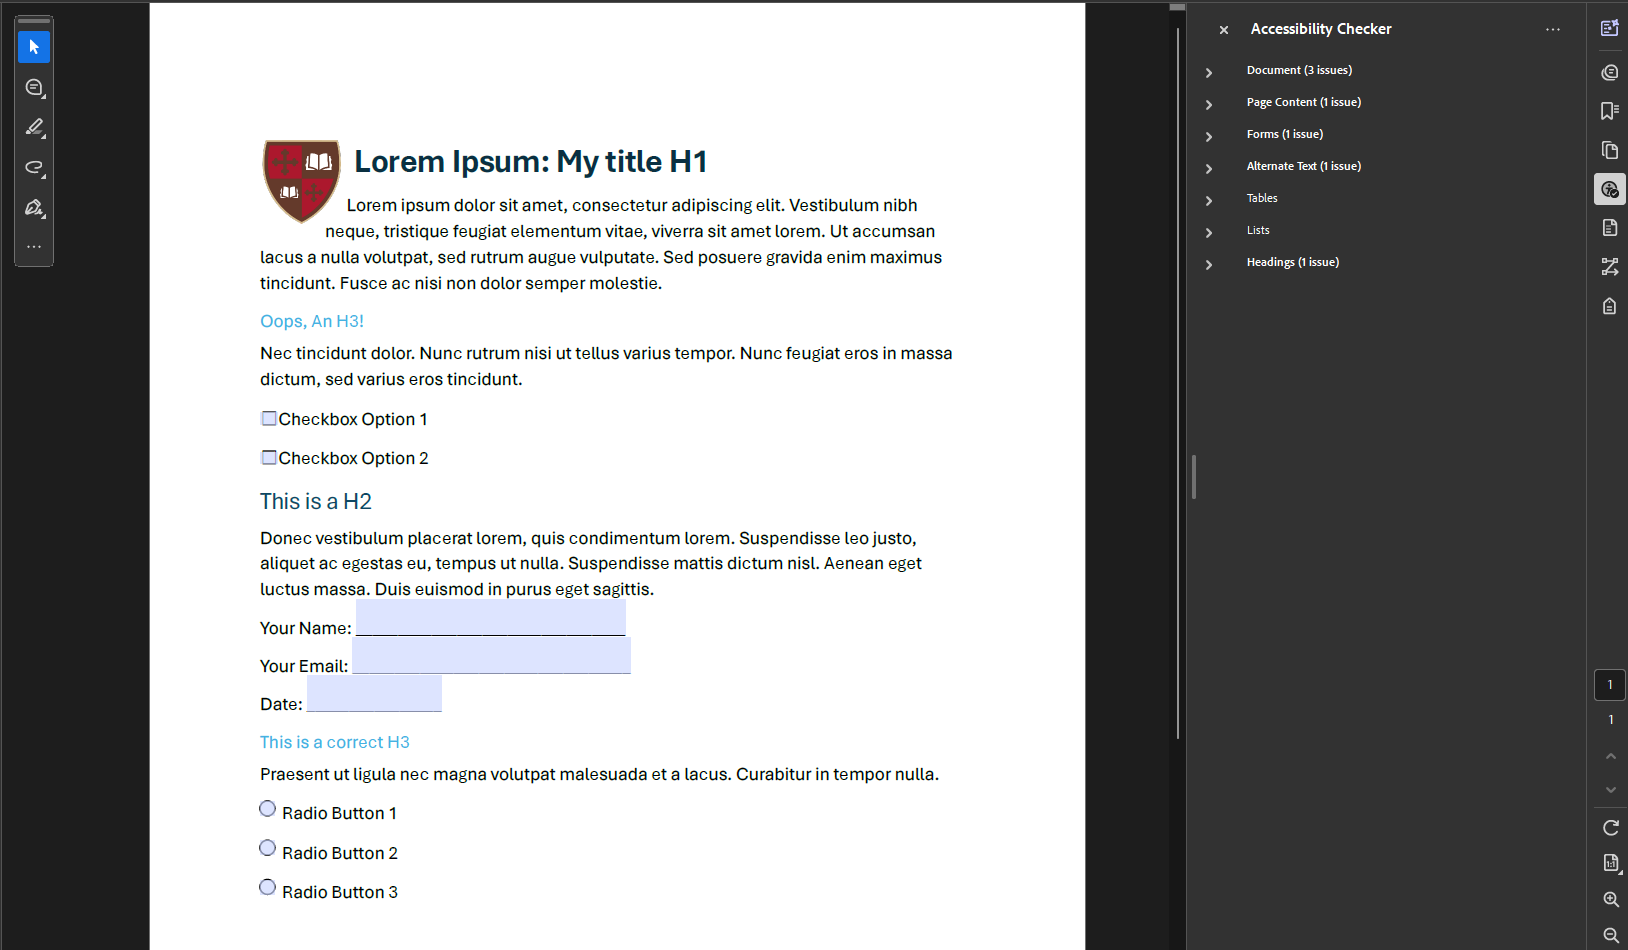
Note: Under the "Document" category, there will always be at least 2 issues listed. "Logical Reading Order" and "Color Contrast" are manual check issues that you need to do for every document.
Correcting Errors in Adobe Acrobat
For each issue that appears in the right sidebar, you will need to go through and manually fix them. To see more details of each issue, click on the carrot (>) next to each category to expand it. If the marked issue has a carrot as well, you can click on it to see which specific elements in the document are causing the check to fail. You'll have to correct the issue for each element.
Some issues are straightforward and others require more in depth corrections. This section will outline the more common issues you may face and how to fix them:
- Document: Title
- Page Content: Tagged Content
- Page Content: Tagged Annotations
- Forms: Tagged Form Fields
- Alternate Text: Figures alternate text
- Headings: Appropriate Nesting
Document: Title
This is the most common issue that we see in uploaded documents. If you've created your document in Word, you can correct this in that program and re-export the PDF by updating the document properties. Doing this through Word means you won't have to correct this issue every time you update the document and want to post a new version of the PDF.
If you do not have access to the Word document, you can also correct this issue directly in Acrobat. Right click on the "Title-Failed" issue in the Accessibility Checker and select "Fix" from the menu. Uncheck the "Leave As Is" checkbox and input your document title then click OK at the bottom.
It should now say "Title - Passed" in the Accessibility Checker sidebar.
Page Content: Tagged Content OR Page Content: Tagged Annotations OR Forms: Tagged Form Fields
For all of these issues, it means that some of the content is missing tags. Tags are invisible content used by screen readers and other assistive technology to understand the structure of the content and provide a logical reading order so it's pretty important that your content is tagged correctly. If you used Acrobat to add form fields to your document, you will probably see this issue come up.
To fix, go over to the left sidebar and select "Automatically Tag PDF." Click "Confirm" in the popup that appears then re-run the "Check for Accessibility" tool. For the majority of documents, this should resolve and tagging issues that popped up under Page Content or Forms.
Alternate Text: Figures alternate text
This is one of those issues that you will have to fix manually for each element that got flagged. Expand the list of elements by clicking on the carrot (>) next to the issue. It'll list elements as "Figure 1," "Figure 2," etc. Clicking on each element will highlight it in the document so you can see what needs alternate text.
To fix, right click on the first element in the list and select "Fix." A popup will appear where you can input your alternate text for that element. In rare cases, something decorative (a background image, a border box, etc) will be flagged. If that is the case you can check the "Decorative Image" checkbox to have assistive technology ignore the element. You can use the arrow buttons in this popup to navigate between all the elements that were flagged as missing alt text. Each one will be highlighted in the document as you click through so you know which one you're writing the alt text for. When you're done click the "Save & Close" button.
All the elements should be removed from the Accessibility Checker and the issue should be listed as "Passed" now.
Headings: Appropriate Nesting
This issue indicates that the heading structure of the document is incorrect. Typically this pops up when a lower heading number was used out of turn but it may also indicate an incorrect heading tag if you used the auto-tag feature earlier. Expand the issue with the carrot (>) to see the list of elements that it is marking as incorrect. Clicking on an element will highlight it in the document.
If you have the Word document, you can correct this issue there to prevent seeing this issue again if you need to update the document to a new version. See the Heading Structure in Word section above.
If the Word document has the headings labelled correctly or you do not have access to the Word file, you can correct this through Acrobat. Right click on the element in the list and select "Show in Tags Panel" from the menu. This will replace your Accessibility Checker sidebar with the Accessibility Tags one and auto select the tag that has the issue.
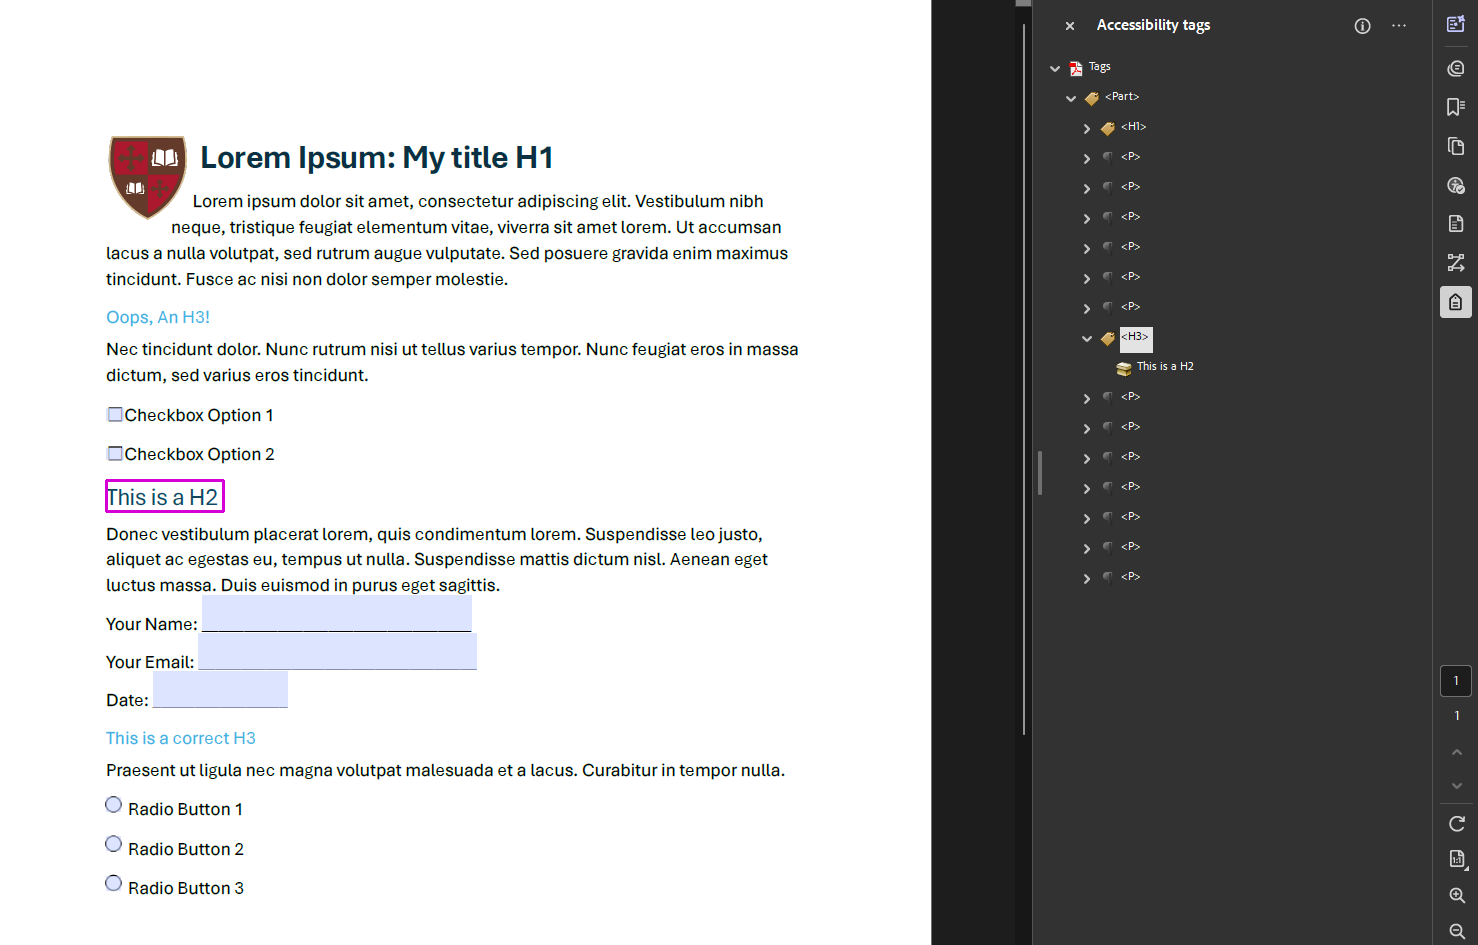
In the example image above, you can see that Acrobat has flagged a heading. The heading being highlighted is supposed to be an H2 but is tagged as an H3. Since the previous heading tag above it is an H1, this is structured incorrectly. To correct it, double click on the incorrect tag and replace it with the correct one. In the case above, the <H3> would be replaced with <H2>.
Note: You may notice in the above example that the two H3's listed in the document are also missing in the Tags panel. They have been incorrectly labeled as paragraph tags (<P>). They would need to be corrected as well, the first in Word to make it an H2 and the second one through the tags panel in Acrobat to make it an H3.
Once the correction is made, run "Check for Accessibility" again to make sure the issue has been fully resolved.
Other Issues
The above are some examples of common issues that pop up but it is not an exhaustive list. If an issue that has not been listed comes up for you, right click on it and see what options Acrobat provides. If there's a "Fix" option, use it to correct the issue. If "Fix" is not an option you can use "Explain" to get a better understanding of what the issue is and how you can manually fix it.
Worst case scenario, if you run into an issue you cannot fix on your own reach out to website@stlawu.edu for help.
Uploading An Accessible PDF
Once you've gone through the Acrobat check on your document and corrected any issues, save the PDF and head over to the website and sign in to upload it.
New Documents
If this is a new document, you are going to go through your Groups tab. Select "Nodes" next to the group the document belongs to and use the "Add New Content" button at the top of that page to add a new Document. Give your document a title, upload the file, then set the status to "Needs Review" and hit "Save."
Once your document is in the "Needs Review" stage, an email will be sent to University Communications that a document needs to be reviewed. Document reviews are typically completed within the week. If issues come up, you will receive an email outlining why the document cannot be published and what you need to correct before reuploading. If there are no issues with the document then it will be published.
Note: We are currently working with IT on getting notification emails set up to let you know when a document has been published however, that system is not currently implemented.
Update to an Existing Document
If your PDF is a new version of an existing document on the website, you'll want to replace that old file rather than creating a new Document. This will make it so you don't have to find all the places you linked the old document to replace those links. It will also remove the old file from searches so users don't get confused about which PDF is the correct one.
To find your existing document, go to Groups at the top and select "Nodes" next to the group the document belongs to. Filter the content list by "Type: Document" to see all the documents in that group. Find the document you want to replace and click the "Edit Node" button next to it. Remove the old file and upload your new one then set the status to "Needs Review" and hit "Save."
As with new documents, once your document is in the "Needs Review" stage, an email will be sent to University Communications that a document needs to be reviewed. Document reviews are typically completed within the week. If issues come up, you will receive an email outlining why the document cannot be published and what you need to correct before reuploading. If there are no issues with the document then it will be published.
Note: We are currently working with IT on getting notification emails set up to let you know when a document has been published however, that system is not currently implemented.